Easy Methods to Harden Leather for Crafting and Accessories
Easy Methods to Harden Leather for Crafting and Accessories
Leather hardening is an essential step for crafting durable bags, belts, wallets, and other accessories. By properly hardening leather, you can make it stiffer, more resilient, and better suited to hold its shape over time. There are several easy methods you can use at home or in a small workshop, including applying natural oils, waxes, or specialized leather hardening solutions. Each technique strengthens the leather fibers without compromising its flexibility or finish. This guide will show you simple, effective methods to harden leather safely, helping you create long-lasting, professional-quality handmade leather products.
Table Of Contents
1. Introduction – Easy Methods to Harden Leather
Hardening leather is an essential step for anyone creating durable and long-lasting handmade accessories, including bags, belts, wallets, and straps. Properly hardened leather maintains its shape, resists wear and tear, and provides a professional, polished finish to your craft projects. There are simple, effective methods to harden leather using natural oils, waxes, or specialized hardening solutions, suitable for both beginners and experienced crafters. In this guide, you’ll learn easy techniques, step-by-step instructions, and practical tips to strengthen leather safely, ensuring your handmade creations are both beautiful and resilient.
Tip
Always test your hardening method on a small scrap piece of leather before applying it to your final project. This helps you see how the leather reacts to oils, waxes, or hardening solutions, ensuring the texture, stiffness, and finish turn out exactly as desired without damaging your main piece.
2. Tools You Need for Custom Leather Engraving
<To effectively harden leather and achieve professional results, you need a few essential tools and materials. Using the right items ensures even application, protects your leather, and helps maintain its quality during the hardening process. Here is a list of the most commonly used tools and materials:
- Leather Piece: Vegetable-tanned or full-grain leather works best for hardening.
- Natural Oils: Such as neatsfoot oil, coconut oil, or mink oil, used to condition and harden leather.
- Leather Wax or Beeswax: Adds stiffness and protects the surface from moisture.
- Brushes or Applicator Cloths: For evenly spreading oils or waxes on the leather surface.
- Heat Source: A hairdryer or heat gun to gently warm the leather and help absorb oils or wax.
- Gloves: Protect your hands when applying oils or waxes.
- Scrap Leather or Testing Pieces: Always test your method before applying it to the main piece.
- Clean Cloth: To remove excess oil or wax after application.
3. Easy Methods to Harden Leather
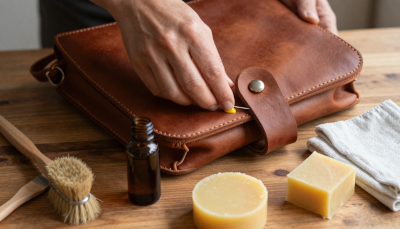
There are several easy and effective methods to harden leather, each suitable for different types of projects and skill levels. Natural oils, such as neatsfoot or coconut oil, penetrate the leather fibers, strengthening them while keeping the surface supple. Applying beeswax or specialized leather hardening solutions creates a protective layer that stiffens the leather and enhances durability. Some crafters also use gentle heat to help the leather absorb oils or wax evenly. By choosing the right method for your leather type and project, you can achieve a firm, long-lasting finish without compromising flexibility or appearance.
- Using Natural Oils: Apply oils like neatsfoot, coconut, or mink oil to penetrate the leather fibers, strengthening them while maintaining flexibility.
- Applying Beeswax or Leather Wax: Creates a protective coating that stiffens the leather and enhances durability.
- Leather Hardening Solutions: Specialized commercial products designed to harden leather safely for crafting projects.
- Gentle Heat Application: Use a hairdryer or heat gun to help the leather absorb oils or wax evenly and speed up the hardening process.
- Layering Techniques: Combine oil and wax applications in multiple thin layers for stronger, long-lasting hardness without cracking.
- Pressure and Shaping: Shape and press the leather while it is hardening to achieve the desired stiffness and form.
4. Step-by-Step Leather Hardening Process
Follow these simple steps to harden your leather effectively. Each step ensures even application, better absorption, and a firm, durable finish for your handmade bags, belts, or accessories.
Step 1: Clean the Leather
Wipe the leather surface with a soft cloth to remove dust, dirt, or debris. Ensure the leather is dry and free from oils that could block absorption.
Step 2: Apply Natural Oil
Using a brush or cloth, evenly apply a thin layer of neatsfoot, coconut, or mink oil to the leather. This penetrates the fibers and begins the hardening process.
Step 3: Heat Gently
Use a hairdryer or low-heat source to warm the leather slightly, helping it absorb the oil or wax evenly. Avoid overheating to prevent damage.
Step 4: Apply Wax or Hardening Solution
Rub a thin layer of beeswax or commercial leather hardening solution over the surface. This stiffens and protects the leather.
Step 5: Shape and Press
While the leather is still pliable, shape it as desired and apply gentle pressure to maintain form and stiffness.
Step 6: Let it Cure
Allow the leather to dry completely for several hours or overnight. Avoid touching or bending it during this time for best results.
Step 7: Buff and Finish
Once cured, buff the leather with a soft cloth to remove excess wax and give a polished, smooth finish.
5. Tips & Tricks for Best Results
- Test First: Always practice your hardening method on a scrap piece of leather before applying it to your main project.
- Use Thin Layers: Apply oils or wax in multiple thin layers rather than one thick layer to prevent uneven stiffness or cracking.
- Even Application: Spread oil or wax uniformly using a brush or cloth to avoid soft spots or overly stiff areas.
- Gentle Heat: Use a hairdryer or low-heat source to help absorb oils or wax but avoid overheating the leather.
- Shape While Pliable: Mold and press the leather into the desired shape while it is still soft for best form retention.
- Allow Proper Curing: Let the leather dry completely before handling to ensure long-lasting hardness and durability.
- Condition Regularly: Maintain leather softness and longevity by occasionally applying a light layer of conditioner after hardening.
6.Conclusion
Hardening leather is a simple yet crucial step to create durable, professional-quality handmade bags, belts, wallets, and other accessories. By using natural oils, waxes, or specialized hardening solutions, and following a step-by-step process, you can strengthen your leather without compromising its appearance or flexibility. Remember to test techniques on scrap pieces, apply materials evenly, and allow proper curing for the best results. With these easy methods and tips, you can achieve long-lasting, beautifully finished leather projects that stand the test of time.
7. FAQs
1. What is the best way to harden leather at home?
Using natural oils like neatsfoot or coconut oil, followed by a layer of beeswax or leather hardening solution, is a safe and effective method to harden leather at home.
2. Can I harden all types of leather?
Vegetable-tanned and full-grain leathers are ideal for hardening. Thin or delicate leathers require caution, as they may crack or warp if over-hardened.
3. How long does it take for leather to harden?
Leather usually needs several hours to overnight to fully harden, depending on the method and materials used. Always allow proper curing for the best results.
4. Can I use heat to speed up the hardening process?
Yes, gentle heat from a hairdryer or heat gun can help leather absorb oils or wax more evenly. Avoid excessive heat to prevent damage.
5. Should I condition leather after hardening?
Yes. Applying a light layer of conditioner after hardening maintains leather flexibility and prevents brittleness over time.
6. How can I test if my leather is fully hardened?
Gently press and bend a small area of the leather. It should feel firmer than before and hold its shape without cracking or creasing.
7. Can I combine oils and wax for better results?
Yes. Applying oils first to penetrate the fibers and then a thin layer of wax creates a stronger, long-lasting hardened leather surface.
8. Is it safe to harden leather multiple times?
Yes, but apply thin layers each time and allow full curing between applications to avoid over-stiffening or cracking the leather.
9. Can I shape the leather while hardening?
Absolutely. Shaping and pressing the leather while it is still pliable helps maintain the desired form and stiffness after hardening.
10. What common mistakes should I avoid when hardening leather?
Avoid applying thick layers of oil or wax, using excessive heat, skipping testing on scrap leather, and handling the leather before it fully cures.
-
 Handmade Flower Embroidered Crossbody Bag – Small Coal LeatherPKR 7,000.00 FREE SHIPPING IN PAKISTAN
 -
 Handmade Flower Embroidered Crossbody Bag – WhitePKR 7,000.00 FREE SHIPPING IN PAKISTAN
 -
 Cross shoulder leather bag, hand stitched embroidery, bag, handbag, white and offwhitePKR 6,500.00 FREE SHIPPING IN PAKISTAN
 -
 Blue Yak Leather Crossbody Bag with Strap & EmbroideryPKR 8,000.00 FREE SHIPPING IN PAKISTAN
 -
 Yak Leather Crossbody Bag with Embroidery & Yellow StrapPKR 7,000.00 FREE SHIPPING IN PAKISTAN