How to Punch Holes in Leather Bags
How to Punch Holes in Leather Bags
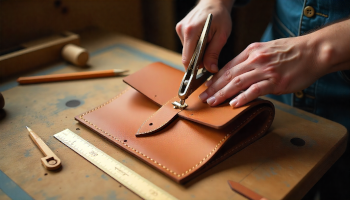
Punching holes in a leather bag looks tricky, but it’s actually simple when you use the right tools and a little technique. Whether you’re adjusting a strap, adding new hardware, or customizing your bag for a better fit, clean and accurate holes make your leather look professional—not damaged. This quick guide walks you through the safest, easiest way to punch holes without cracking, stretching, or weakening your leather. Perfect for beginners, DIY lovers, and anyone upgrading their bag the right way.
Table Of Contents
- 1. Introduction – How to Punch Holes in Leather Bags
- 2. Tools You Need to Punch Holes in Leather
- 3. Measuring & Marking – Preparing the Leather
- 4. Methods for Punching Holes in Leather Bags
- 5. Step-by-Step Guide – Punching Clean & Even Holes
- 6. Safety Tips – Avoid Cracks, Stretching & Damage
- 7. FAQs – Punching Holes in Leather Bags
1. Introduction – How to Punch Holes in Leather Bags
Punching holes in a leather bag might look difficult, but with the right tools and a simple step-by-step approach, anyone can do it safely. Whether you’re adjusting a strap, adding new hardware, or customizing your bag for a better fit, clean and precise holes make your leather look professional—not damaged. This guide walks you through everything you need to know, from choosing the right punch to avoiding cracks, stretching, and uneven cuts. It’s quick, beginner-friendly, and perfect for upgrading your leather bag without ruining its quality.
- Use the right tools like a leather hole punch, rotary punch, or awl for clean results.
- Always measure and mark the spot before punching to avoid uneven placement.
- Work on a sturdy, flat surface to keep the leather steady.
- Place a cutting mat or thick board under the leather to protect both the tool and your table.
- Use gentle pressure first, then increase force to avoid cracking the leather.
- Choose the correct punch size to match buckles, straps, or rivets.
- Test the punch on a scrap piece of leather before using it on your bag.
- Keep the punch tool sharp for clean, smooth-edged holes.
- Finish punched holes by lightly sanding or smoothing the edges.
- Condition the leather after punching to prevent dryness and maintain durability.
Tip
When punching holes in a leather bag, start by measuring carefully and marking the spots twice to ensure precision. Always test your punch on a scrap piece of leather before working on your actual bag, and make sure your punch tool is sharp for clean, professional-looking holes. Work on a flat, sturdy surface and place a cutting mat or thick board underneath to protect your tools and furniture. Apply gentle pressure first, then gradually increase it to avoid cracking the leather. Choose the correct punch size to match straps, buckles, or hardware, and after punching, lightly smooth the edges with sandpaper or an edge beveler. Finally, condition the leather afterward to maintain its softness, durability, and overall polished look, and always work in a well-lit area so your markings and punch points are easy to see.
2. Tools You Need to Punch Holes in Leather
Having the right tools makes punching holes in leather bags easy, precise, and damage-free. Using improper tools can lead to uneven holes, cracks, or stretched leather. From specialized leather punches to simple awls, choosing the correct tool for your leather type and hole size ensures professional-looking results every time. In this section, we’ll cover the essential tools you need and how to use them safely for clean, accurate holes.
- Leather Hole Punch: A specialized tool with multiple hole sizes, perfect for creating clean, even holes in leather straps and bags.
- Rotary Punch: Features a rotating wheel with different punch sizes for quick and precise holes.
- Awl: A pointed tool used to mark or start holes in leather before punching for accuracy.
- Cutting Mat or Board: Protects your work surface while providing a stable base for punching.
- Ruler or Measuring Tape: Ensures accurate placement and spacing of holes.
- Pencil or Fabric Marker: Marks the exact spot where the hole should go without damaging the leather.
- Edge Beveler or Sandpaper: Smooths and finishes punched hole edges for a professional look.
- Leather Conditioner: Keeps leather soft and durable after punching holes.
3. Measuring & Marking – Preparing the Leather
Proper measuring and marking are key to creating clean, precise holes in leather bags. Rushing this step can lead to uneven or misplaced holes that ruin the bag’s look and functionality. By carefully measuring, marking, and double-checking your leather, you ensure every hole is perfectly aligned for straps, buckles, or hardware. This step also helps prevent accidental mistakes, making the punching process smooth and professional-looking.
| Step | ction | Tip |
|---|---|---|
| 1 | Measure the leather using a ruler or measuring tape. | Ensure exact placement for straps or hardware. |
| 2 | Mark the spots lightly with a pencil or fabric-safe marker. | Mark on the backside if possible to keep the front clean. |
| 3 | Double-check all measurements before punching. | Prevents uneven or misplaced holes. |
| 4 | Ensure even spacing between multiple holes. | Use a straight edge or template for accuracy. |
| 5 | Consider leather thickness and stretch. | Adjust placement so holes don’t weaken the leather. |
4. Methods for Punching Holes in Leather Bags
There are several methods to punch holes in leather bags, each suited to different tools, leather thickness, and hole sizes. Choosing the right method ensures clean, precise holes without damaging the leather. From using a traditional leather hole punch to an awl or rotary punch, understanding the techniques helps you achieve professional results. This section covers the most effective methods so you can pick the one that works best for your project.
- Using a Leather Hole Punch: This is the most common method. A leather hole punch comes with multiple punch sizes and allows you to create clean, round holes quickly. Simply select the right size, align it with your marked spot, and press down firmly.
- Using a Rotary Punch: A rotary punch features a rotating wheel with different hole sizes. It is ideal for punching multiple holes in a row, such as adjusting straps. Rotate the wheel to the correct size, place it on the mark, and squeeze the handles for a precise hole.
- Using an Awl: An awl is a pointed tool used to pierce leather. This method works best for smaller, precise holes or for marking the starting point before using a punch. Gently twist the awl into the leather at your marked spot to create a small hole.
- Using a Drill: For thick or tough leather, a small hand drill or rotary tool can be used carefully. Make sure to use the correct drill bit size and apply gentle pressure to avoid tearing or stretching the leather.
- Using a Mallet and Punch: For very thick leather, you can use a steel punch with a mallet. Place the punch on the marked spot, and strike firmly with a mallet to create a clean hole without damaging the leather.
- Punching Multiple Holes with a Template: When creating evenly spaced holes, use a template or guide. This method ensures professional alignment, especially for belts, straps, or decorative holes.
5. Step-by-Step Guide – Punching Clean & Even Holes
Punching clean and even holes in a leather bag requires a careful, methodical approach. Rushing or skipping steps can lead to uneven holes, cracks, or stretched leather. By following a step-by-step guide, you can achieve precise, professional-looking results every time. This section walks you through the entire process, from measuring and marking to finishing the holes, ensuring your leather bag looks polished and durable.
- Step 1 – Gather Your Tools: Collect all necessary tools including a leather hole punch, rotary punch, awl, ruler, pencil, cutting mat, and mallet if needed.
- Step 2 – Measure and Mark: Carefully measure the spot where you want the hole. Mark it lightly with a pencil or fabric marker to ensure accuracy and alignment.
- Step 3 – Secure the Leather: Place the leather on a flat, stable surface. Use a cutting mat or thick board underneath to protect both the leather and your work surface.
- Step 4 – Choose the Right Punch Size: Select the correct punch size for your strap, buckle, or hardware to ensure the hole is neither too big nor too small.
- Step 5 – Align the Punch: Position the punch over the marked spot. Double-check the alignment to avoid misplaced holes.
- Step 6 – Apply Pressure: Press down firmly using the punch, rotary tool, or mallet. Apply steady, even pressure to create a clean, round hole without cracking the leather.
- Step 7 – Check the Hole: Inspect the hole for smooth edges. If needed, use sandpaper or an edge beveler to refine it.
- Step 8 – Repeat if Necessary: For multiple holes, repeat the measuring, marking, and punching process, ensuring even spacing and alignment.
- Step 9 – Clean Up the Area: Remove any pencil marks or debris around the holes to maintain a professional look.
- Step 10 – Condition the Leather: Apply leather conditioner around the punched area to keep the leather soft, durable, and resistant to cracking.
6. Safety Tips – Avoid Cracks, Stretching & Damage
Punching holes in leather bags can damage the material if done incorrectly. Cracks, stretching, or uneven holes can ruin both the look and durability of your bag. By following simple safety tips, you can protect your leather while achieving clean, professional results. This section covers essential precautions and best practices to ensure every hole is precise, the leather remains strong, and your bag stays in top condition.
7. FAQs – Punching Holes in Leather Bags
1. What tools do I need to punch holes in a leather bag?
You’ll need a leather hole punch, rotary punch, or awl, a ruler, pencil or fabric marker, a cutting mat, and optionally a mallet for thicker leather.
2. How do I measure and mark holes accurately?
Use a ruler or measuring tape to find the exact spot, mark lightly with a pencil or fabric-safe marker, and double-check alignment before punching.
3. Can I punch holes in any type of leather?
Most natural leathers like full-grain, top-grain, and suede can be punched carefully. Thin or delicate leathers require extra caution to avoid tearing.
4. How do I avoid cracking or stretching the leather?
Use the correct punch size, apply even pressure, work on a flat surface, and consider practicing on a scrap piece first to prevent damage.
5. How do I make evenly spaced holes?
Use a ruler, template, or straight edge to mark equal distances between holes before punching. This ensures a professional and symmetrical look.
6. Can I use an awl instead of a hole punch?
Yes, an awl can create small, precise holes or mark spots before using a punch, especially on delicate leather.
7. Should I condition the leather after punching holes?
Absolutely. Conditioning helps maintain softness, prevent dryness, and preserve the durability around the punched holes.
8. Is it safe to punch multiple holes in thick leather?
Yes, but use a mallet with a steel punch and apply steady pressure. Take your time to avoid cracking or uneven holes.
9. Can I fix a hole if I make a mistake?
Mistakes are hard to completely fix, but you can reinforce the area with leather patches, rivets, or decorative hardware to cover the error.
10. Are there alternative methods to punch holes without tools?
Some people use heated needles or nails carefully, but these methods carry higher risk of damage. Using proper leather punches is recommended for clean, safe results.
-
 Cross shoulder leather bag, hand stitched embroidery, bag, handbag, charcoalPKR 3,500.00 FREE SHIPPING IN PAKISTAN
 -
 Handmade Flower Embroidered Crossbody Shoulder BagPKR 6,500.00 FREE SHIPPING IN PAKISTAN
 -
 Handmade Flower Embroidered Crossbody Bag – Chocolate BrownPKR 6,500.00 FREE SHIPPING IN PAKISTAN
 -
 Red Handmade Flower Embroidered Crossbody BagPKR 7,000.00 FREE SHIPPING IN PAKISTAN
 -
 Handmade Flower Embroidered Crossbody Bag – GrayPKR 7,000.00 FREE SHIPPING IN PAKISTAN